On this side I cut the seam out completely first.
This was due to the fact that the laser level showed this side to be taller than
the other by 5mm-3/16". But also that the cowl width was out 2mm so dealt with
that at the same time. I straighten out the fold and then refolded it by hand as
it has a slight curve near the top.


Can just make out the curve which will join onto the
A pillar at the top of the fold. I used the completed side where I had already
gotten all the correct angles to make sure this side turned out the same when
adding on the door sill.


So to wrap up. The door sill profile has been extended right across the bottom of the cowl.
The Willys pressing added and the bead running along the forward edge continues
now to the bottom. Cowl seam has been welded up and cut away flush from the
back. Rust repairs, including replacing nearly the whole bottom 12" as well as
part of the door sill done. Holes filled and dents removed. The whole bottom
half of the cab, back wall included, does not have a single original spot weld
left! Now onto the donor firewall where these attach. The upper part was angled
10* forward and needed to be vertical.


I have pulled around the edge leaving the area where
the brake booster etc attaches untouched as much as possible. I did this
be continuing the flat part of the floor further forward. See on the photo
before how the curve started as the trestle and now it is at the oval hole. I
angled the fold using a curved flipper.


In between the ridges I used a curved dolly that
matched the flipper. Also dressed it out using a curved hammer that I had made
the heads on for such a task with a dolly underneath.


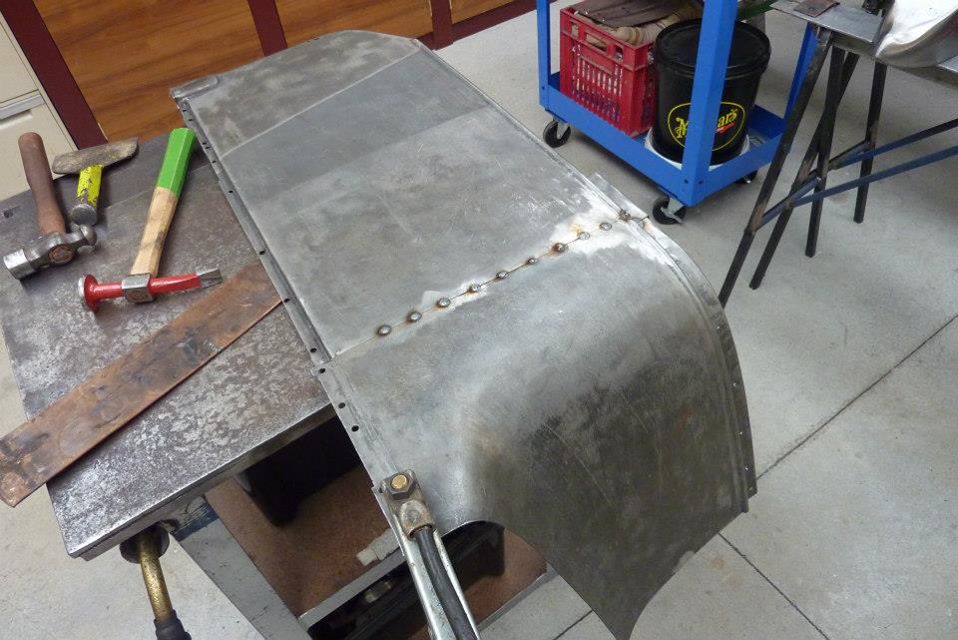
Finally bought a tig when it came on sale. After less then a couple of hours practise I thought I would
already have a go on the Willys panels. So this is my first weld ever with the
tig while also doing just fusion welding too. The weld above was done without
stopping and shows the backside penetration as well.


I am just a passing on what worked for me after lots of reading and watching, so by no means
an expert but sharing in case it helps some one. This also applies mainly to a
inverter tig which are more sensitive to electrode size. So this is the setup
that worked the best for the cowl and old tailgate pressing which is 1.2mm/18Ga,
and 1.6mm/16Ga. A 1.6 mm/0.065 inch, 2% lanthanated tungsten electrode. Best if
you use one as close as possible to the thickness of the metal being welded for
the easiest time. I am using lanthanated as can be used for steel and aluminium
etc and you don't have the problems of breathing in the radioactive dust with
sharpening it. Using a no.4 cup with the gas flow around 6 L/min-20cfm.


All welded in using fusion welding mainly. A couple of the corners had a slight gap
so used mig wire as a filler rod when welding those. Torch angle was at 105*, or
15* off vertical, leaning away from direction of travel. The filler wire was
added at a 15* angle off horizontal just in front of the puddle. It is
recommended that the wire be 90* to the torch angle, which this adds up to. I
used the principle of 30-35 amps per 1mm/0.40 of metal thickness that my tig
welders manual recommended. Only draw back with using no filler wire and doing
fusion only, is that you can still see where the weld was after planishing and
sanding smooth.


For panels this is generally regarded as being quite acceptable and structurally
sound. I did however go back over it with filler wire to see how it would come
out. In the foreground of the right picture is the outside part of the cowl. The
centre part of the cowl does not blend in with it. Partly due to the fitting of
the tailgate piece in the middle of the cowl section after removing the centre
vent, but also due to the fact the cowl changes width and curvature over its
length. Don't forget that the centre part is 9" longer than what was in there
before.


Just used a bossing mallet and the rounded flipper over a beater bag to shape it
to match. Took quite a bit of mucking around to get it all curving evenly
between the too. Next I checked the top edge and had to alter that to match the
piece under the windscreen. I did not want to change the angle in the windscreen
piece as it must stay the same to match the upper roof section so the glass is
sitting flat. Something else I did was lower the Willys pressing more and allow
the material to curve around it while keeping the pressing flat. Sits now at the
same height as the rib in front and it also released the twist the panel had at
the same time.
[BACK][NEXT]
[Index]